5-Step Process: Deploying Waterfall Node and Activating Validators
1. Expand the project
Login to private registry
The source code for Waterfall is currently closed (it will be opened after a security audit), so the source code and images are stored in a private repository. To access the private Docker image registry, you need to log in. Execute the following command in the terminal:
docker login -u public -p glpat-tPuF6v2fxjwQzBrdhLm7 registry.waterfall.network
Pull image
Download image from the private registry, where you logged in on the previous step. Use the latest Docker image that contains all the necessary software to run the node. To do this, you need to execute the following command in the terminal:
docker pull registry.waterfall.network/waterfall/protocol/docker:2-mainnet
2. Run Node
You can find the full instructions and details here.
Execute the following command in the terminal:
cd ~
Executing the following command in the terminal:
docker run --platform linux/amd64 --name wf -d --rm -p 4000:4000 -p 13000:13000 -p 12000:12000/udp -p 30303:30303 -p 9545:9545 -p 9546:9546 -v $PWD/.wf:/opt/wf/data registry.waterfall.network/waterfall/protocol/docker:2-mainnet
3. Prepare data
Install wf-cli and use this document
-
Generate Mnemonic: Use the following command to generate a mnemonic and save it in the
.datadirectory of your project:
wf-cli mnemonic--path: This specifies the directory where the generated mnemonic will be saved. The mnemonic is a 24-word phrase that will be used to generate and secure the validator keys.
Example:
./wf-cli mnemonic --path .data Path: .data Mnemonic saved to .data/mnemonic.txt -
Create a
password.txtfile in the.datadirectory and put the password you generated in it - Your
.datadirectory should look like this:.data ├── mnemonic.txt └── password.txt
Generate Keys and Deposit Data
You can find the full instructions and details here.
- Run the following command to generate the keys and deposit data. This command will use the mnemonic and password for security, set the withdrawal address (using the address from the delegating_stake configuration if provided in future), specify the number of validators, and determine the output path and starting index:
wf-cli gen-data--memoThis specifies the file path to the mnemonic, which is a 24-word phrase used to generate the validator keys securely.--passThis specifies the file path to the password, which is used to encrypt and secure the validator keys.--withdrawal-address: This sets the Waterfall address where the staking rewards will be withdrawn to. If the delegating_stake configuration is provided, the address from this configuration will be used.--output-path: This defines the directory where the generated keys and deposit data will be saved.--index: (Default: 0) This sets the starting index for the validators, allowing the user to specify where the count begins.--count: This indicates the number of validators to be generated.
Example:./wf-cli gen-data --memo .data/mnemonic.txt --pass .data/password.txt --withdrawal-address 0xee22555a22A7fd2eBA102f6200695F75ab28C4b6 --count 10 --output-path .data/keys Output path: .data/keys Provider: https://rpc.waterfall.network Mnemonic: .data/mnemonic.txt WithdrawalAddress: 0x3d1F455aD3F6927FbF09059F702f4EdDEB195C02 Count: 10 Key generation 1 out of 10 Key generation 2 out of 10 Key generation 3 out of 10 Key generation 4 out of 10 Key generation 5 out of 10 Key generation 6 out of 10 Key generation 7 out of 10 Key generation 8 out of 10 Key generation 9 out of 10 Key generation 10 out of 10
- Your
.data/keysdirectory should look like this:.data/keys ├── coordinator │ ├── validator_keys │ └── password.txt ├── gwat │ ├── keystore │ ├── address.txt │ └── password.txt
4. Import
- Copy keys to config dir eg:
.wf/config/keys-123 ├── coordinator │ ├── validator_keys │ └── password.txt ├── gwat │ ├── keystore │ ├── address.txt │ └── password.txt - Run import
or
docker exec -it wf /opt/wf/sh/import.sh keys-123 delegating_stake.jsonThe system will responddocker exec -it wf /opt/wf/sh/import.sh keys-123After this, execute the status command in the terminal to determine that your validator is running. Example:INFO local-keymanager: Successfully imported validator key(s) publicKeys=0xac1a2e7717a4,0x8c45f4a9af030x802c5a574ae8 Done. 3 Validators have been imported.In response, you will get the following result:docker exec -it wf /opt/wf/sh/status.shValidator #3: Coordinator public key: 0xac1a2e7717a4d1bf0eef76c7643f14da845182bd1f0b3525bbe32b24cd5b087b5e11ef87150348a0004e7f766e135aca Verifier address: 0x2dddfd7ba0777cbc9d6f8315e7a3cd248d2e2173 Can Withdraw: 0x3ae40befc1638ea949823a5cbac74898a123db3b Receives rewards: 0x3ae40befc1638ea949823a5cbac74898a123db3b=100% Can Exit: 0x3ae40befc1638ea949823a5cbac74898a123db3b Receives stake: 0x3ae40befc1638ea949823a5cbac74898a123db3b=100% Compare with state: unknown The coordinator has not been activated Verifier status: pending_activation Verifier balance: 0 WATER Validator #4: Coordinator public key: 0x8c45f4a9af036224b1d971d200150b76a54d4be0aa980466f5f97d8a18f257393630597ff7fe42b2df83f030332abf1d Verifier address: 0xff61b51a8f9a24904b55540b238ba7268b166c40 Can Withdraw: 0x3ae40befc1638ea949823a5cbac74898a123db3b Receives rewards: 0x3ae40befc1638ea949823a5cbac74898a123db3b=100% Can Exit: 0x3ae40befc1638ea949823a5cbac74898a123db3b Receives stake: 0x3ae40befc1638ea949823a5cbac74898a123db3b=100% Compare with state: unknown The coordinator has not been activated Verifier status: pending_activation Verifier balance: 0 WATER Validator #5: Coordinator public key: 0x802c5a574ae813c506108f7b58ab9dc3b3820c1e859883b3661f0eb42e2c2b55a44924d8b4fdc34898a8ac2d7a86134b Verifier address: 0x4657133d2624a3379f94c6c9838a443928d49daf Can Withdraw: 0x3ae40befc1638ea949823a5cbac74898a123db3b Receives rewards: 0x3ae40befc1638ea949823a5cbac74898a123db3b=100% Can Exit: 0x3ae40befc1638ea949823a5cbac74898a123db3b Receives stake: 0x3ae40befc1638ea949823a5cbac74898a123db3b=100% Compare with state: unknown The coordinator has not been activated Verifier status: pending_activation Verifier balance: 0 WATER
Attention
Send .data/keys/coordinator/validator_keys/deposit_data.json and delegate_rules.json to User
5. Activate validators in application
The user needs to download a file to open the application. More details can be found here.
After downloading and opening the application, the following steps are followed:
- Open Waterfall App
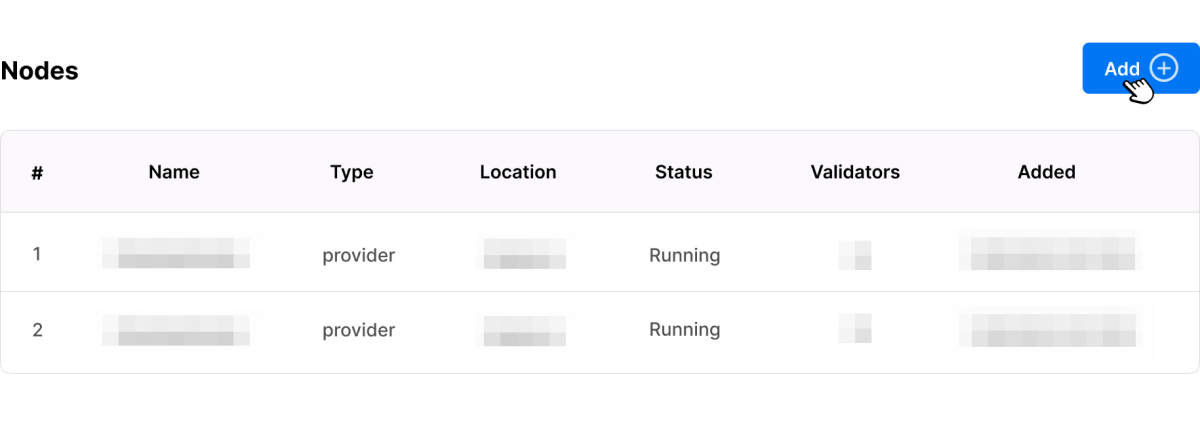
- Go to the "Nodes" section.
- Press the "Add" button.
- Select Node Type - Provider
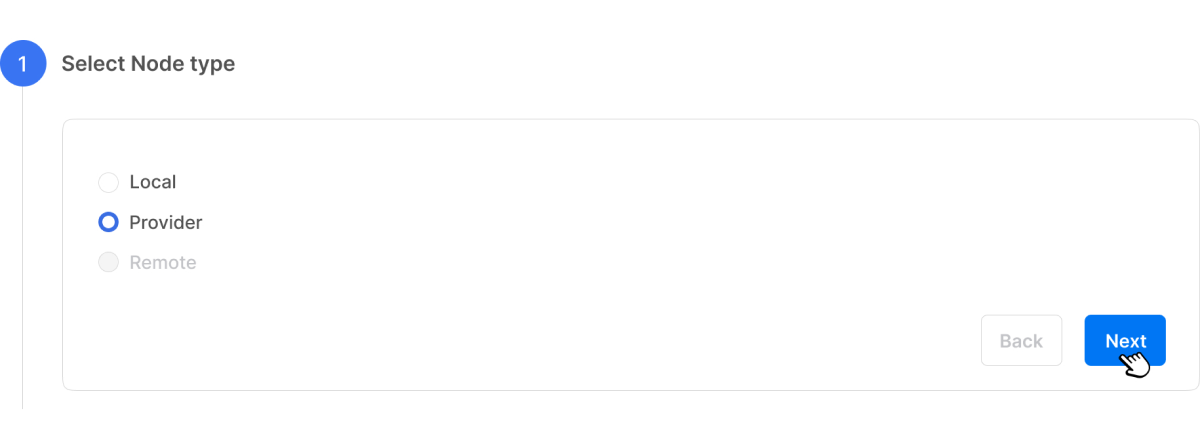
- Select Network - Mainnet

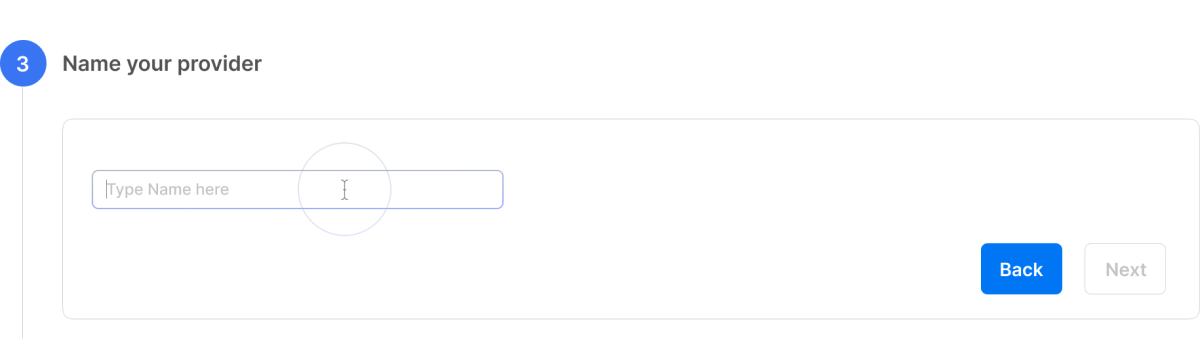
- Name your Provider - Name the provider you are working with
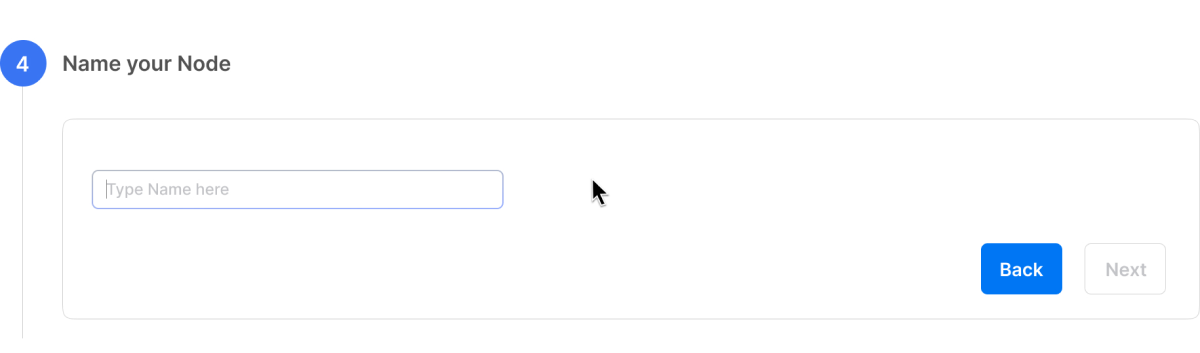
- Name your Node - set the name of your Node
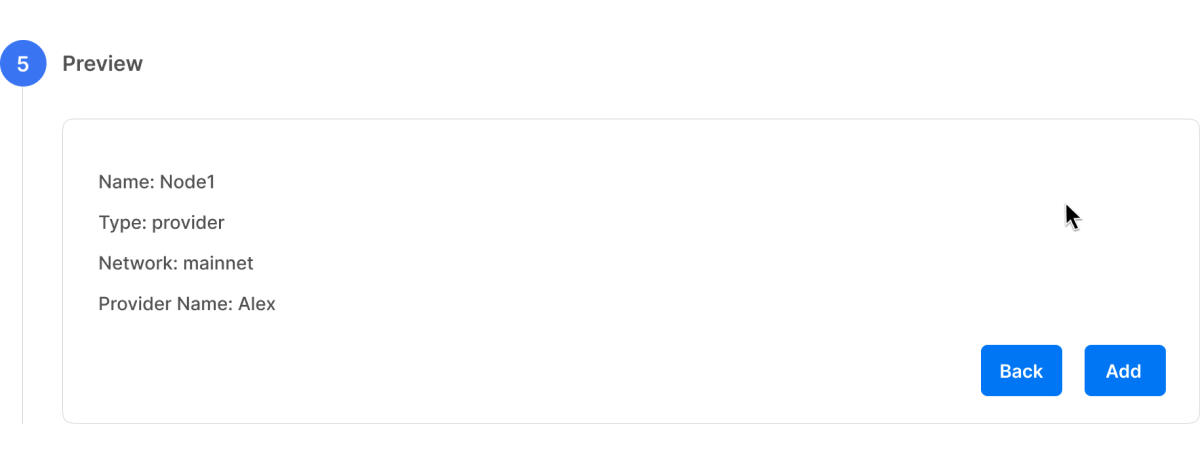
- Preview the details
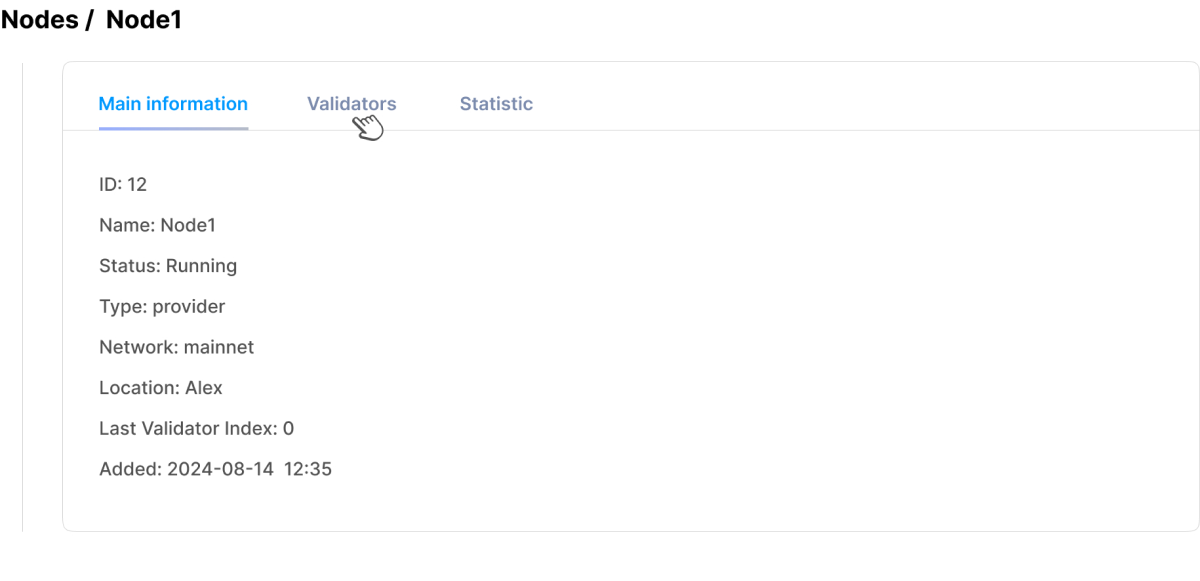
- In the node that you created, go to the "Validator" section.
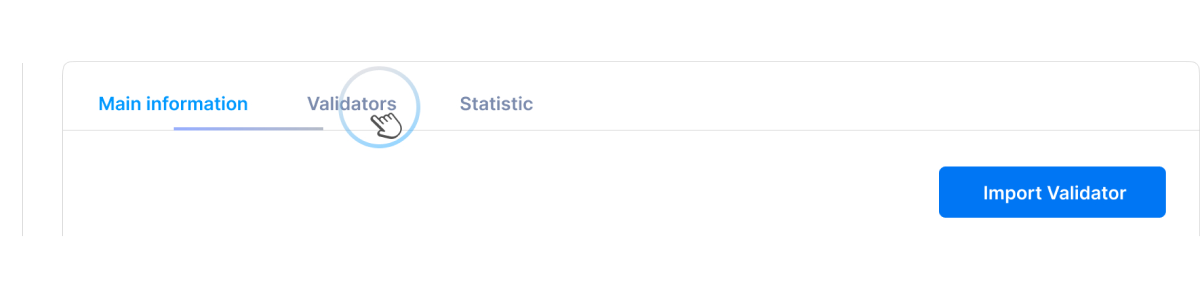
- Press the "Import Validators" button
 Users need to download the files sent by the provider and upload them to the following fields:
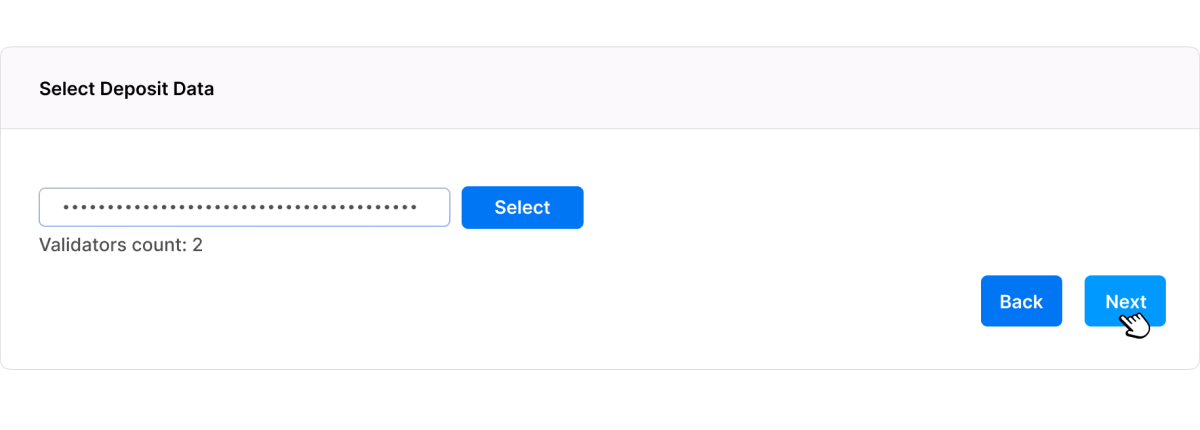
 - Select a Deposit Data - Upload the file "deposit data."
- Check your Validators Count
- Select a Delegate Rules - Upload the file "delegate rules."
- Carefully check the addresses and rewards-sharing percentage.

- Click Import
- Go to Validators
- Find your new validators. See status - Pending Initialization
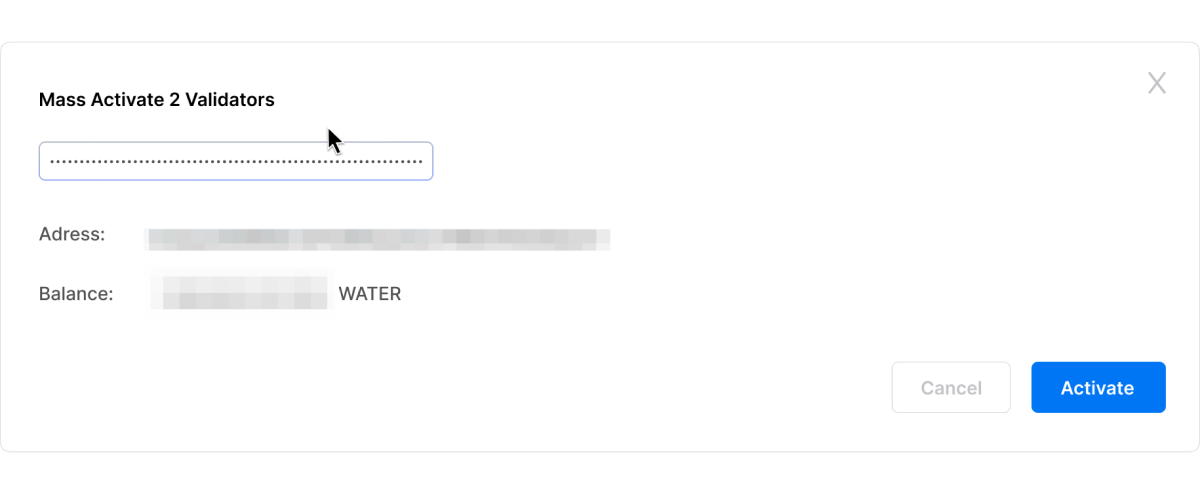
- Mark checkboxes

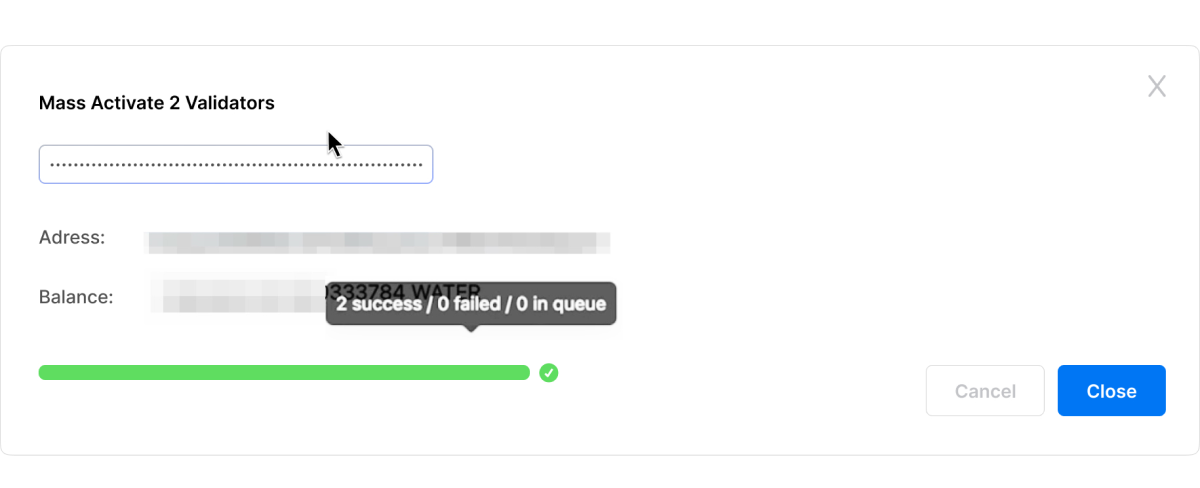
- Click Activate the Validator

- Enter the private key of the address you see on your screen (this is the address where you should have the balance of WATER coins you are going to stake).
- The green progress bar will load
- A green checkmark will appear when validators are activated and will show how many validators have been activated.